Tessellations by Other Figures
K-12: Materials at high school level.

In this section we will explore some methods for creating Escher like tessellations. We will use the geometry we have developed in the previous sections to create tessellations by recognizable figures.
Explorations
Introduction
A tessellation, or tiling, is a division of the plane into figures called tiles. The most common tessellations today are floor tilings, using square, rectangular, hexagonal, or other shapes of ceramic tile, but many more tessellations were discussed in the Tessellations by Polygons chapter.

Escher's primary interest in tessellations was as an artist. He wanted to created tessellations by recognizable figures, images of animals, people, and other everyday objects that his viewers would relate to. He used these figures to tell stories, such as the birds evolving from a rigid mesh of triangles to fly free into the sky in Liberation. In Predestination, flying birds and fish are born from the same black and white tessellation, fly into three dimensionality, and then meet when the fish completes the "predestined" killing of the bird.
In his native Dutch, Escher called these tessellations 'Regelmatige Vlakverdeling', and collected them in his sketchbook. His sketches drew inspiration from geometric patterns created by Islamic artists. The Islamic religion forbids the creation of representational images, and so Islamic artists have developed a broad vernacular of decorative patterns over centuries of work. Escher writes[1]:
What a pity that the religion of the Moors forbade them to make images! It seems to me that they sometimes came very close to the development of their elements into more significant figures than the abstract geometric shapes that they created. No Moorish artist has, as far as I know, ever dared (or didn't he hit on the idea?) to use as building components concrete, recognizable figures borrowed from nature, such as fishes, birds, reptiles, or human beings. This is hardly believable, for recognizability is so important to me that I never could do without it.
Though Escher's goal was recognizability, his tessellations began with geometry, and as he grew more accomplished at creating these tessellations he returned to geometry to classify them. All of Escher’s tessellations by recognizable figures are derived from just a handful of geometric patterns. There are several different techniques that Escher used, and sometimes he combined techniques as well, but all involve a transformation from a simple geometric pattern to a complicated, recognizable figure.
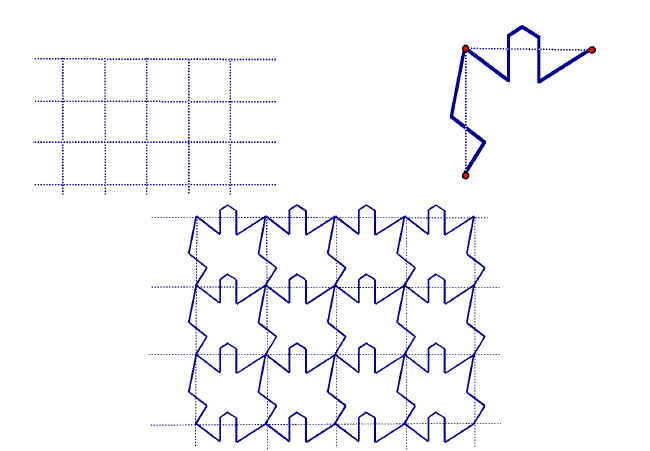
The simplest example of an Escher tessellation is based on a square. Start with a simple geometric pattern, a square grid, and then change that ever so slightly.
In this example each vertical edge of the grid was deformed to look like a lightning bolt. Then, each horizontal edge was redrawn as a bent curve. Note that all the vertical pieces were changed in the same way, and that all horizontal pieces look the same as well.
The bends were not introduced with any intention of creating a particular shape, but now that the new pattern is drawn it becomes a sort of inkblot test. What do you see? Some will think it looks like interlocked men, others may see birds. Decorating each of the newly formed tiles can emphasize a particular interpretation, and creates a tessellation by recognizable figures, in the style of Escher. This method also works well if you start with a geometric tessellation by rectangles or parallelograms, as we will see in the section #Tessellating With Translations.
Escher wrote that creating these tessellations is a "compelling game", and like any game it is fun once you learn the rules. Practice making your own tessellation based on squares, and make more tessellations using the different techniques of this section as you learn them.
Tessellating With Slides
The simplest and most flexible tessellations are Escher's Type I systems, which can be based on a paralellogram, rhombus, rectangle or square.


To create one of these tessellations, follow these steps:
- Draw a parallelogram. This is easy on graph paper, as you can count squares to ensure the opposite sides are parallel and the same length.
- Alter the top edge of one parallelogram by replacing it with a curved or crooked line.
- Translate that edge to the bottom of the paralleogram.
- Alter the left edge of the parallelogram
- Translate the left edge to the right side.
This gives a figure which tessellates, and with luck its outline will suggest a recognizable motif that you can develop with further alterations to the edges. Finish by creating more copies of the motif by translation.
The resulting tessellation has symmetry group p1.

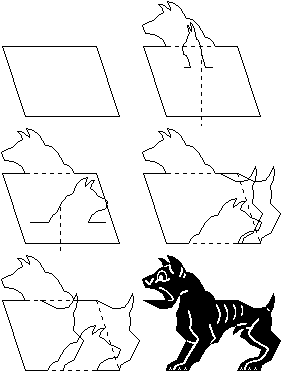
Escher's Regelmatige vlakverdeling, Plate I is an illustrated description of this process. A grid of parallelograms appears in panels 1-4, then develops bent or curved edges in panels 5-7. Finally, with the addition of detail, the tile becomes a bird or a fish.
Escher made many sketches using system I. Some good examples to look at include Sketch #38 (Moths), Sketch #73 (Flying Fish), Sketch #74 (Birds), Sketch #105 (Pegasus), Sketch #106 (Birds), Sketch #127 (Birds), and best of all Sketch #128 (Birds) where it is very easy to see how the bird motif developed from a square tile.
Tessellating With Flips
Figures with bilateral symmetry are naturally easier to make into recognizable figures, because many natural forms have bilateral symmetry. To create a tessellation by bilaterally symmetric tiles, we need to start with a geometric pattern that has mirror symmetries. However, these mirror symmetries should not lie on the straight sides of the polygon tiles. If they do, the straight sides must remain straight and there is no longer flexibility to make a recognizable figure.
A Two Tile Pattern

This is a very simple method for generating a tessellation by two different tiles. Each of the two tiles has bilateral symmetry.
Begin with a tessellation by rectangles. The vertical mirror symmetries down the centers of the rectangles will remain in the final tessellation.
- Draw a rectangle.
- Alter one side, for example the left side.
- Alter half of the top edge, and half of the bottom edge.
- Reflect the side and both half-edges across the central vertical mirror line.
Repeat the resulting figure in a checkerboard pattern, leaving spaces which form the other tile of the tessellation.
Notice that the horizontal strips of tiles form frieze patterns with pm11 symmetry, which explains why the horizontal translation is by two tiles - the vertical mirror lines must be spaced at half the translation length.
A cm Pattern


This pattern begins with a tessellation by rhombuses.
- Draw a rhombus.
- Alter one side, for example the top left side.
- Translate from the top left to the bottom right side.
- Reflect both top left and bottom right across the vertical center line of the rhombus to finish all four sides.
The resulting figure tessellates in a pattern similar to wood shingles, and gives a tessellation with symmetry group cm.
Escher's Sketch #91 (Beetles) uses this technique.
Tessellating With Glide Reflections
This simple arrangement of parallelograms is a good starting point for creating tessellations with glide reflection symmetry:
The pattern has horizontal translation symmetry, and vertical glide reflection. To create an interesting tessellation from it:

- Draw a parallelogram (or rectangle).
- Alter the top edge of the parallelogram by replacing it with a curved or crooked line.
- Glide-reflect that edge to the bottom of the paralleogram.
- Alter the left edge of the parallelogram
- Translate the left edge to the right side.
This gives a figure which tessellates. Repeat identical copies of it to the left and right, and repeat mirror image copies above and below.
The resulting tessellation has symmetry group pg. Escher would describe this as a Type V system, although it doesn't fit exactly into his categorization. Along with Sketch #97 (Bulldogs), Escher used this technique in Sketch #108 (Birds) and Sketch #109 (Frogs). Another good example is Sketch #17 (Parrots), though it is a slight variant.
For a shape that lends itself even more towards recognizable figures, divide each parallelogram into two halves by drawing its short diagonal. Then, erase the horizontal edges to form a tessellation by "kite" shapes:
Alternately, draw the long diagonals and erase horizontal edges to form a tessellation by "dart" shapes:

To create a tessellation using the kite or dart pattern above, follow these steps:
- Draw the kite or dart pattern by starting with parallelograms.
- Alter one top edge of the kite or dart by replacing it with a curved or crooked line.
- Glide-reflect that edge to the bottom of the kite or dart.
- Alter the other top edge of the kite or dart.
- Glide-reflect that edge to the bottom of the kite or dart.
Escher classified this sort of tessellation as Type IV. Good examples of tessellations based on the kite shape are Sketch #62 (Sniffers), Sketch #66 (Winged lions), Sketch #67 (Horsemen), and Sketch #96 (Swans). The birds in Sketch #19 (Birds) are only slightly altered from the dart scaffolding, although Escher's visible grid of rhombuses suggests he went about the construction in a completely different manner.
Escher wrote in his summary chart that Type IV tessellations have translations in both diagonal directions and glide-reflections in both transversal directions. This means that motifs that share a side are reflected images, and motifs that touch at corners (diagonally) are translated images.

Tessellating With Turns
There are many ways to use rotation symmetry as the basis for a tessellation, and only some simpler ones will be described in this section.
Turns and Slides
Escher's Type II tessellations begin with a grid of parallelograms (squares, rectangles, and rhombuses also work). The tile will be distorted into a shape that can tessellate using 2-fold rotations at all four vertices and 2-fold rotations in the centers of one pair of opposite sides, as shown by the red dots in the figure below.


To create a tessellation using this technique;
- Draw a parallelogram, rhombus, rectangle, or square.
- Alter the top edge of the parallelogram by replacing it with a curved or crooked line.
- Translate that edge to the bottom of the parallelogram.
- Alter half of one remaining side by replacing it with a curved or crooked line.
- Rotate that half side by 180° to complete the side.
- Repeat steps 4 and 5 with the remaining straight side.
This gives a figure which tessellates. Repeat identical copies of it by translating up and down, and repeat rotated copies of it to the left and right. This results in a tessellation with symmetry group p2. Examples in Escher's work include Sketch #75 (Lizards), Sketch #115 (Fish and birds), and Sketch #117 (Crabs).
Turns about the midpoints of sides
All triangles tessellate, and all quadrilaterals tessellate. The pattern for these general tessellations is built from 180° rotations about the midpoints of the polygon sides. Altering half of each side and filling in the other half by rotation will also give a tessellating shape. In fact, this technique quite general and works for many geometric tessellations.
- Draw a 3- or 4-gon
- Create a midpoint on each of the sides.
- Modify one half of each of the sides.
- Rotate each side 180° about the midpoint.
Fill in the tessellation by rotations. Because 180° rotations were used but neither reflections nor glide reflections, the resulting patterns will have symmetry group p2.


For Escher, these were Type III tessellations. The best example is Sketch #88 (Seahorse), because Escher's geometric scaffolding for the sketch is also in his notebook. In the scaffolding, the underlying shape appears to be a triangle but should really be viewed as a quadrilateral with two sides in a straight line, giving four vertices and four midpoint rotation centers.
Another good example is Sketch #9 (Birds). In Sketch #9 (Birds), each bird is derived from a quadrilateral which you can find by connecting the points with four birds coming together. In Escher's scaffolding for the sketch, there is a visible grid of paralleograms which he obviously used to lay out the picture. His scaffolding is an easier way to build this type of tessellation by hand, and relies on a theorem of Euclidean geometry:
- The four midpoints of the sides of any quadrilateral form a parallelogram
Escher would have drawn the grid of parallelograms, constructed the midpoints of each side of the parallelogram, and then altered the parallelogram to the bird form allowing the sides to bend and corners to move.
Other examples of Type III tessellations are Sketch #90 (Fish) and Sketch #93 (Fish), where in the latter the eyes and mouths of the fish destroy the rotation symmetry of the silhouette.
Turns about a vertex
Starting with a pattern of squares can produce a resulting tessellation with an order 4 rotation and symmetry group p4.
- Draw a square.
- Modify one side.
- Using 90° rotations at the vertices, copy the modified side to the other three sides.
Fill in the tesselation by 90° rotations:

Escher made no tessellations using this technique, but did do something similar with his Type X tessellations. In these, he would divide the square into two 45°-45°-90° triangles, and use a 180° rotation around the midpoint to modify the dividing line. Examples are sketches Sketch #35 (Lizards), Sketch #118 (Lizards), and Sketch #119 (Fish).


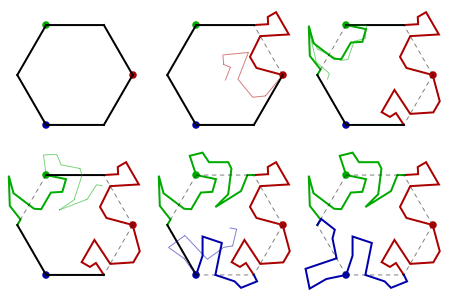
Rotation about a vertex can be applied to a regular hexagon as well, and Escher used this as the basis for one of his most successful tessellations, Sketch #25 (Reptiles). Altering the hexagon shape will break some of the many symmetries of the hexagon grid, so it is important to carefully identify which symmetries will remain in the final tessellation. In this example, the only symmetries used are order 3 rotation symmetries of three types, marked in the picture below as the red, blue, and green dots. Each edge of the grid touches exactly one of these rotation centers, so three edges of each hexagon are free to alter and the other three are forced by the choice of symmetry.
The steps for creating the tile in this pattern are:
- Draw a hexagon, and mark three of its corners (here they are red, green, and blue).
- Choose a marked corner, and alter a side that touches it.
- Rotate the altered side to the other edge at that corner.
- Repeat with the other two marked corners.
Other Interesting Methods

Cutting a tile into two pieces is a simple way to get added flexibility. The dividing line rarely needs to obey any symmetries, and so can be drawn freely. A good example of this is Escher's Sketch #76 (Birds and horses), which could be started as a Type IV or Type V grid of parallelograms each divided into two. Other examples based on translation only are Sketch #52 (Birds and frogs) and Sketches #47-50 which are the basis for Verbum.
Pentagon tessellation. Escher's favorite Alhambra pattern.
Relevant examples from Escher's work
- Regelmatige vlakverdeling, Plate I
- Regular Division of the Plane Drawings, particularly those which also show the underlying geometric tessellation:
- Sketch #67 (Man on horse) and related work Visions of Symmetry pg. 111.
- Sketch #96 (Birds)
- Sketch #127 (Birds)
- Sketch #128 (Birds)
Related Sites
- Tessellation Database by Snels-Design.
- Escher in the Classroom by Jill Britton.
- ↑ M.C. Escher, Escher on Escher, H. Abrams, 1989, pg 25


